最新资源
简介
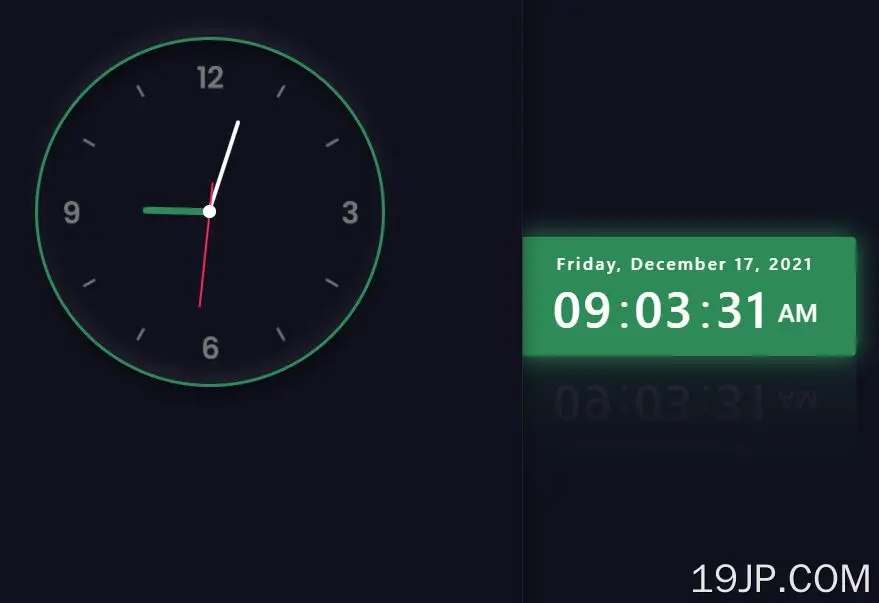
在本教程中,我们将使用JavaScript(jQuery)创建数字和模拟时钟。我们的时钟会很简单,但它们仍然能准确地报时。
继续滚动学习如何创建这两种类型的时钟,我们还将提供一些自定义它们的技巧。让我们开始吧!
å¦ä½ä½¿ç¨å®:
1.为数字和模拟时钟创建HTML。
- <!-- Analog Clock -->
- <div class="clock">
- <div class="hour">
- <div class="hor" id="hor">
- </div>
- </div>
- <div class="minutes">
- <div class="mn" id="mn">
- </div>
- </div>
- <div class="seconds">
- <div class="sc" id="sc">
- </div>
- </div>
- </div>
- <!-- Digital Clock -->
- <div class="datetime">
- <div class="date">
- <span id="day">Day</span>,
- <span id="month">Month</span>
- <span id="num">00</span>,
- <span id="year">Year</span>
- </div>
- <div class="time">
- <span id="hour">00</span>:
- <span id="min">00</span>:
- <span id="sec">00</span>
- <span id="period">AM</span>
- </div>
- </div>
2.创建按钮以在时钟类型之间切换。
- <button class="dig" onclick="digital()">Digital clock</button>
- <button class="analog" onclick="analog()">Analog Clock</button>
3.加载时钟.js(模拟时钟)和数字.jsjQuery之后的(数字时钟)脚本。
- <script src="/path/to/cdn/jquery.min.js"></script>
- <script src="/path/to/js/clock.js"></script>
- <script src="/path/to/js/digital.js"></script>
4.å¿ è¦çCSSæ ·å¼ã
- .dig, .analog{
- height: 42px;
- align-self: center;
- margin-left: 2em;
- padding: 10px;
- border-radius: 8px;
- border: 3px solid rgb(57, 138, 243);
- cursor: pointer;
- transition: 0.3s ease all;
- }
- .clock{
- width: 420px;
- height: 420px;
- margin:0 auto;
- margin-top: 5%;
- display: flex;
- justify-content: center;
- align-items: center;
- background: url(clock.png);
- background-size: cover;
- border: 4px solid seagreen;
- border-radius: 50%;
- box-shadow: 0 -15px 15px rgba(255,255,255, 0.05),
- inset 0 -15px 15px rgba(255,255,255, 0.05),
- 0 15px 15px rgba(0, 0, 0, 0.3),
- inset 0 15px 15px rgba(0, 0, 0, 0.3);
- }
- .clock:before{
- content: '';
- position: absolute;
- width: 15px;
- height: 15px;
- background: #fff;
- border-radius: 50%;
- z-index: 10000;
- }
- .clock .hour, .clock .minutes, .clock .seconds{
- position: absolute;
- }
- .clock .hour, .hor{
- width: 160px;
- height: 160px;
- }
- .clock .minutes, .mn{
- width: 190px;
- height: 230px;
- }
- .clock .seconds, .sc{
- width: 230px;
- height: 230px;
- }
- .hor, .mn, .sc{
- display: flex;
- justify-content: center;
- position: absolute;
- border-radius: 50%;
- }
- .hor:before{
- content: '';
- position: absolute;
- width: 8px;
- height: 85px;
- background: seagreen;
- z-index: 10;
- border-radius: 6px 6px 0 0;
- }
- .mn:before{
- content: '';
- position: absolute;
- width: 5px;
- height: 120px;
- background: #fff;
- z-index: 11;
- border-radius: 6px 6px 0 0;
- }
- .sc:before{
- content: '';
- position: absolute;
- width: 2px;
- height: 150px;
- background:rgb(252, 40, 86);
- z-index: 12;
- border-radius: 6px 6px 0 0;
- }
- .datetime{
- margin:0 auto;
- margin-top: 15%;
- color: #fff;
- background:seagreen ;
- font-family: "Segoe UI", sans-serif;
- width: 410px;
- padding: 15px 10px;
- border: 3px solid seagreen;
- border-radius: 5px;
- -webkit-box-reflect: below 1px linear-gradient(transparent, rgba(255,255,255, 0.1));
- box-shadow: 0 0 30px seagreen;
- }
- .date{
- font-size: 20px;
- font-weight: 600;
- text-align: center;
- letter-spacing: 3px;
- }
- .time{
- font-size: 60px;
- display: flex;
- justify-content: center;
- align-items: center;
- }
- .time span:not(:last-child){
- position: relative;
- margin: 0 6px;
- font-weight: 600;
- text-align: center;
- letter-spacing: 3px;
- }
- .time span:last-child{
- background: seagreen;
- font-size: 30px;
- font-weight: 600;
- text-transform: uppercase;
- margin-top: 10px;
- padding: 0 5px;
- border-radius: 3px;
- }
5.使时钟在设备之间完全响应。
- @media screen and (max-width: 600px){
- .clock{
- height:350px ;
- width: 350px;
- }
- .datetime{
- width: 380px;
- }
- .date{
- font-size: 18px;
- }
- .time{
- font-size: 50px;
- }
- }
- @media screen and (max-width: 450px){
- .datetime{
- width: 350px;
- }
- .clock{
- height:330px ;
- width: 330px;
- }
- .date{
- font-size: 16px;
- }
- .time{
- font-size: 45px;
- }
- }
6.初始化时钟。就是这样。
- initClock();


